Friday 13 May 2016

Remote keyless system

Remote keyless system

A remote control for a keyless entry system built into an ignition key. Pressing a button on the key unlocks all of the car doors. Another button locks the car.
keyless entry system is an electronic lockthat controls access to a building or vehiclewithout using a traditional mechanical key. The term keyless entry system originally meant a lock controlled by a keypad located at or near the driver's door, that required pressing a predetermined (or self-programmed) numeric code for entry. These systems, having evolved into a hidden touch-activated keypad, are still available on certain Ford or Lincoln models.
The term remote keyless system (RKS), also called keyless entry or remote central locking, refers to a lock that uses an electronic remote control as a key which is activated by a handheld device or automatically by proximity.[1]
Widely used in automobiles, an RKS performs the functions of a standard car key without physical contact. When within a few yards of the car, pressing a button on the remote can lock or unlock the doors, and may perform other functions. A remote keyless system can include both a remote keyless entry system(RKE), which unlocks the doors, and a remote keyless ignition system (RKI), which starts the engine.
Remote keyless entry fobs emit a radio frequency with a designated, distinct digital identity code. Inasmuch as "programming" fobs is a proprietary technical process, it is typically performed by the automobile manufacturer. In general, the procedure is to put the car computer in 'programming mode'. This usually entails engaging the power in the car several times while holding a button or lever. It may also include opening doors, or removing fuses. The procedure varies amongst various makes, models, and years. Once in 'programming mode' one or more of the fob buttons is depressed to send the digital identity code to the car's onboard computer. The computer saves the code and the car is then taken out of programming mode.
As RKS fobs have become more prevalent in the automobile industry a secondary market of unprogrammed devices has sprung up. Some web sites sell steps to program fobs for individual models of cars as well as accessory kits to remotely activate other car devices. Many sites, provide RKS fob programming instructions for free.
On early (1998-2012) keyless entry remotes, the remotes can be individually programmed by the user, by pressing a button on the remote, and starting the vehicle. However, newer (2013+) keyless entry remotes requiredealership or locksmith programming via acomputer with special software . The Infraredkeyless entry systems offered user programming, though radio frequencykeyless entry systems mostly require dealer programming.

Tuesday 10 May 2016

How The Lubrication System Works In An Engine

How The Lubrication System Works In An Engine


You drive your car every day, isn’t it nice to know how does it work? There are the relevant details of how the combustion engine works.
You may know about maintaining your car that is you have to change the Engine lubrication oils time to time. What you may not know is where the oil goes, what does it do? and why it needs to be changed time to time?
The first task of oil in the engine is to keep the things oily so they could not get dry. Just think for a while if the eardrum-piercing sounds of metal pistons screeching up and down inside a dry cylinder. It will be so annoying, isn’t it?
There are pleasant effects of keeping the engine lubricated with automotive lubricants. There is little friction, which makes a sense that engine has to make little effort to keep it running. So, it means that it is able to skate on less fuel can run at the lower temperature. And this means that less wear and tear on the engine parts. Engine needs to fill with clean oil so it can perform well.
Never get fooled by the term “lubrication”, sometimes when you go to the local quick lube work shop, they recommend you are supposed to have a “lube job”. That is certainly not an oil change. That absolutely means oiling the chassis and suspension system. None of them shares the oil with lubrication system in engine.

Lubrication system
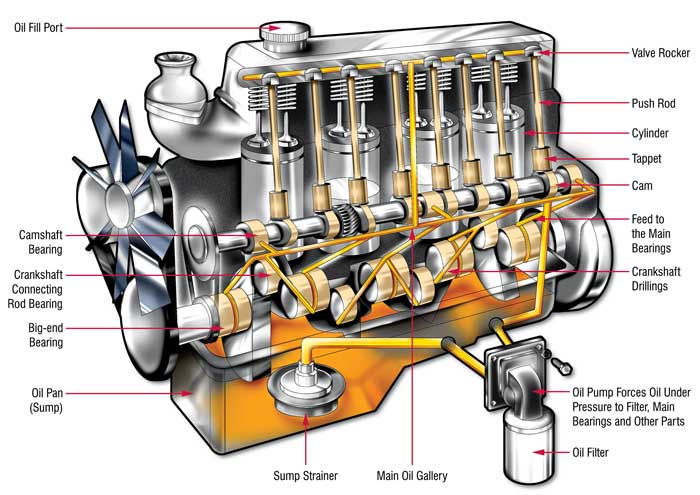
The Engine lubrication system is considered to give a flow to the clean oil at the accurate temperature, with a appropriate pressure to each part of the engine. The oil is sucked out into the pump from the sump, as a heart of the system, than forced between the oil filter and pressure is fed to the main bearings and also to the oil pressure gauge. The oil passes through the main bearings feed- holes into the drilled passages which is in the crankshaft and on to the bearings of the connecting rod. The bearings of the piston-pin and cylinder walls get lubricated oil which dispersed by the rotating crankshaft. By the lower ring in the piston the excess being scraped. Each camshaft bearing is fed by the main supply passage from a branch or tributary. And there is another branch which supplies the gears or timing chain on the drive of camshaft. The oil which is excesses then drains back to the sump, where the heat is being transferred to the surrounding air.

Journal Bearings
If the crankshaft journals get worn, the engine will be having very low oil pressure and will throw oil all over inside the engine. The unnecessary splash will overcome the rings and can cause the engine to use that oil. Simply replacing the bearing inserts can restore the worn bearing surfaces. In well maintained engine, bearing wear take places instantly after a cold start because there is less or no oil film between the shaft and bearing. At the time that enough automotive lubricants is dispersed through the hydrodynamic lubrication system apparent and stops the bearing wear progress.

Piston rings - cylinder
A sliding seal avoiding leakage of the air mixture or fuel is provided by piston rings. It gets weaken into the oil sump while combustion and compression from the combustion chamber. On other hand, from leaking into the combustion area they keep oil in the sump, where it will be burned and lost. Those cars that burn oil and have to be added, a quart at every 1,500 miles are flaming it because the rings get no longer to be sealed properly.
Hydrodynamic lubrication prevails in the center of the cylinder wall and the piston rings of the good maintained car, essential for the very lower wear and friction. The thickness of the film becomes assorted and minimal lubrication may exist where the piston will stop to redirect on the top and bottom of the dead centre.
To analyze or realize well head transfer from the piston to the cylinder, a finest sealing, a minimal thickness of film and a minimum of oil burning is desirable. Oil controlling ring keeps minimal the thickness of film. This is ring is located after the piston rings so that the surplus oil directly scraped down to the sump. To lubricate the following ring the oil film left on the cylinder wall by the passage of this ring will be available. 
 
Oil degradation results by the air mixture or leakage of the fuel which exhaust from the combustion chamber into the oil sump. That is why, frequent replenish of oil despites, oil change will remain essential or it can also become more essential.
Picture, engine lubricating scheme: Machinery Lubrication Magazine.

For more details. Please visit our website: www.lubrita.com  -Industrial Oils  manufacturer. 

Welcome to Lubrita.com
International Lubrita Distributors network and World wide Oils & Lubricants online stores.

Sunday 8 May 2016

How timing engine work


Where should I set the timing on my performance engine?


There really is no specific initial timing specs for any performance engine. You certainly can't go by the factory specs when your engine isn't all bone stock and isn't running all factory components, especially when running an aftermarket distributor, or even a stock replacement distributor. This is because the factory KNOWS how much advance your distributor has in it (because they built it) in conjunction with the amount of initial timing they tell you to set it at. Replacement distributors, whether they are performance or stock, are all different than your original distributor so you obviously can't use the factory setting, besides, stock engines, stock distributors and stock timing specs weren't designed for optimum performance, even in factory muscle cars they were kind of mediocre.  Also, (and pretty obvious), performance engines aren't stock, they run differently so they need different timing settings. You really have to time an engine of this sort solely by the "total timing". Total timing is a combination of your initial timing (on the crank) and the amount of mechanical advance you get from your distributor.
Most naturally aspirated engines like a total timing of 34 to 36 degrees BTDC, (Before Top Dead Center) AKA "Advance". Nitrous and supercharged engines usually run less than that, unless you plan on blowing the heads off the engine or blowing holes through your pistons. usually a typical supercharged or nitrous engine with a moderate amount of boost ora moderate shot of nitrous will have a total timing of about 28-32 degrees. But that is variable on the type of fuel you are using and the amount of boost or nitrous you are running.
To check and set the total triming, you need a timing light with a timing offset built-in. You can tell this kind of light from a standard light because it will have a dial on the back side. These lights are usually a few bucks more than the regular lights but they do a lot more.
Most street engines use either a vacuum advance and/or a mechanical advance (the weights inside the distributor). More serious performance engines "usually" only use the mechanical advance, and most true race engines are usually "locked-out" and have no advance in the distributor at all. They also have no vacuum advances mounted on them in most cases.
There are several types of timing that you need to know about. First, there's the initial timing, which is also known as "idle timing", which is where the timing is at an idle without the help of the mechanical weights inside the distributor, and without the vacuum advance hooked-up. Then there's the mechanical advance, which is the advance you get from the weights inside the distributor. As the engine RPM comes-up, it's the initial timing AND the mechanical advance that gives you your TOTAL timing. For instance; say your distributor has 26 degrees of mechanical advance built into the weights inside and you want a total of 36 degrees of total timing; you would need to set the initial timing (idle timing) at 10 degrees (10 degrees on the crank and 26 degrees from the mechanical weights = 36 degrees of total timing).
The trick is; for performance use you want as much advance as you can get on the crank and the least amount from the mechanical weights in the distributor, hence why race distributors have no mechanical advance at all. To really make a trick street set-up you should only have about 10 degrees or so of mechanical advance in the distributor and about 24 - 26 degrees of initial timing on the crank to obtain your total of 34 - 36 degrees of total timing. This will launch you out of the hole much harder, and give you great jack rabbit starts from street light to street light. You NEED advance at low RPM to make that engine pull hard. It'll have MUCH better throttle response, a better idle vacuum signal, and it'll run cooler & cleaner. Unfortunately stock engines & distributors are set-up completely the opposite so they need to be re-curved to fix this problem. This is why some guys can tune an engine and make it run killer (like we do), and other's just can't seem to get their car to get out of its own way.
Now; to find and set the total timing all you need to do is set the dial on your timing light to 36. Now rev your engine up to about 3,500 RPM (to insure that the mechanical weights are fully activated) and watch your timing mark on the harmonic balancer. Now rotate your distributor until the marks line-up at "0" on the crank. When it reads "0", (yet the light is set at 36), you have a total timing of 36 degrees. Make sure you do this with your vacuum advance NOT hooked-up. If you don't run a vacuum advance, then don't do anything, just leave everything as it is and tighten it down and you're good to go. Your engine isn't really at "0" or Top Dead Center. The timing light isoffsetting the light beam by 36 degrees, so you should be reading "0" on the crank.
The total advance will change if you replace your distributor or install an advance curve kit, so always check it and KNOW where your timing is at! It's REAL important on more radical engines, especially on high compression / supercharged and/or nitrous engines! One degree off on the timing can mean anywhere fron 20, 30 or even as much as 40 horsepower loss in some engines!
Now, if you use a vacuum advance, (which is pretty much only there for part throttle economy), hook it up AFTER you have set the total timing. Of course when you are driving down the highway at part throttle, the vacuum advance will pull anywhere from 10 to 15 degrees MORE advance (beyond your total timing), BUT under hard acceleration, the vacuum advance doesn't work anyway, so you're back on your total timing when you're on the throttle. Personally? I almost never use a vacuum advance on performance engines, although a vacuum advance can also be used to help engines get rid of "run-on" or "Dieseling" problems when you shut the engine off. You can do this by hooking it up to a manifold vacuum source to pull more advance when the engine is idling. For those of you that can follow along with that concept, the reason for doing this is to make that extra timing being pulled at an idle to increase the idle RPM, which in turn allows you to back-off on the idle speed screw, which in turn closes-off the throttle plates so when you shut the engine off, it can not "mechanically" continue to pull fuel and air into the engine causing it to Diesel.
Remember this; a correctly timed engine produces the most horsepower. An engine with timing too late (retarded) will have a low idle vacuum, have slow throttle response, feel like a turd at low RPMs and will run hotter than normal. An engine with the timing too soon (advanced) will have a high and erratic vacuum signal. It might have a snappy throttle response but it won't pull very well under a load, and it will have pre-ignition (detonation) problems, sometimes called "pinging", which will certainly lead to either a blown head gasket and/or serious piston damage. It will also idle rough, like it has a bigger cam than it actually does.
Keep this in mind too; once you set your timing and you don't physically move the distributor, the timing will pretty much never go out. The first thing people do (who have no clue what the hell they're doing) when their engine starts running funny, is to start twisting the distributor around and screwing with the timing. The timing will NOT affect any ONE particular cylinder. It can ONLY affect ALL of them at once, so if you have a back fire or a missfire or a dead cylinder, there is no need to start messing around with the timing. Again, if you don't move it, it'll stay set pretty much forever.
I had someone ask me; "If I set my total timing at 36 degrees at 3,500 RPM, will it still be 36 degrees at 7,000 RPM? If not, how much will it change?"
Below is the answer I gave him:
Well that depends. If you've set your distributor up to get full mechanical advance at or below 3,500 RPM, or have at least checked it to see that it’s all in by 3,500 RPM, then your answer is yes, once you hit full advance it won’t keep advancing as more RPM comes up. Once the mechanical advance weights sling-out at their given RPM, which is set by the type of weights it has, and more-so by the stiffness of the springs to give you your “mechanical advance”, they don’t (and can’t) come-out any farther. Most stock distributors are set to get full mechanical advance at about 4,000 RPM. Brand new MSD distributors come with ridiculously stiff springs in them that don’t see full advance until upwards of 4,500 – 5,000 RPM. You want all of your advance in at about 2,400 RPM. 3,000 is too high, 2,000 “might be” a bit low, so somewhere in there is where you want to be. This is why re-curving your distributor is essential. Not having full advance at or below 3,000 RPM is pretty useless considering an engine needs its advance to run at its best and to get that car moving. Stock, or un-curved, distributors that don’t see full advance until 4,000 – 4,500 RPM are a bit late in most cars and WILL cause your car to not move off the line or accelerate very well below it’s full advance RPM. But like I said, once the weights have slung-out… they’re out and won’t give it any more advance. The trick is to know how much advance you have, and WHEN it comes in. If it comes-in too late, then you need to change the springs and maybe even the weights to make it come-in sooner. If it has too much advance, then you need to limit the amount of advance inside the distributor and give it more “initial” timing on the crank to achieve the 34-36 degrees of desired total. I usually like to see about 10 – 14 degrees in the distributor and the rest on the crank in most performance engines.

Please Note!
We just provided you with a TON of excellent information on how to time your engine. It's not rocket science! We can't explain it any easier, better, or different, so do NOT call us and ask us to explain to you all over again! We're busy running a business and don't have time to hold everyone's hand on how to do something as simple as timing an engine. If you are unsure, or aren't clear, then go back and RE-READ what we just provided for you. Sorry for sounding like a dick but we get calls every freakin' week from people who seem to think we've got nothing better to do than to just hand-out free advice all day, or hold people's hands any time they call-in. Not gonna happen, so please don't call.

Saturday 7 May 2016

Valve

Engine Intake and Exhaust Valve Basics

Contributed By: D. Lindsey
Engine Intake and Exhaust Valve
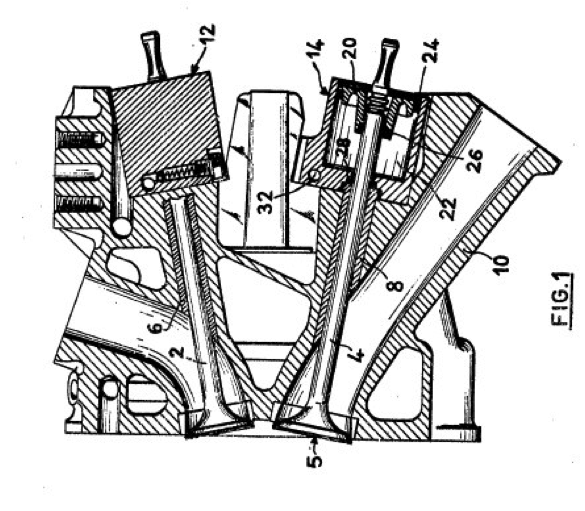
Engine valves are located in the cylinder head. The main function of the engine valves is to let air in and out of the cylinders. That air is used to help ignite the fuel which will drive the pistons up and down.
There are two types of engine valves; intake and exhaust valves.
Engine Intake and Exhaust Valve
The intake valves of course let air in, and theexhaust valves let exhaust air out. The more air you can move air in and out of the engine the more efficient, and therefor power the engine will have. This is why the engine valve plays a pretty critical role in an engines performance.
Engine Intake and Exhaust Valve
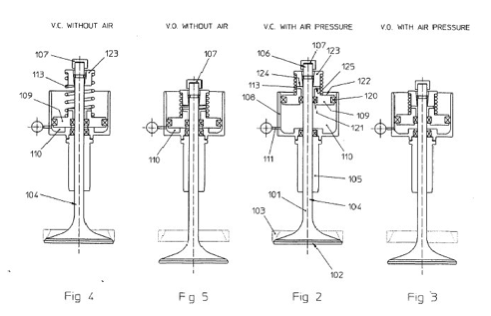
Pistons travel up and down inside cylinders. At the top of the pistons journey are the valves. There are a varying number of valves depending on the manufacturer. As the piston is at the bottom of the cylinder, the intake valve opens to let air in, it then closes so the cylinder is air tight to build compression. Once the piston goes through the compression and firing stroke, the exhaust valve will open and let the exhaust out. It then closes immediately after. But you may ask how do the valves open and close? There is a shaft that pushes on the all the valves called a cam shaft. Be sure to check out the cam shaft link for more information on the camshaft.


Friday 6 May 2016

How a diesel engine works

How Do Diesel Engines Work?

By 
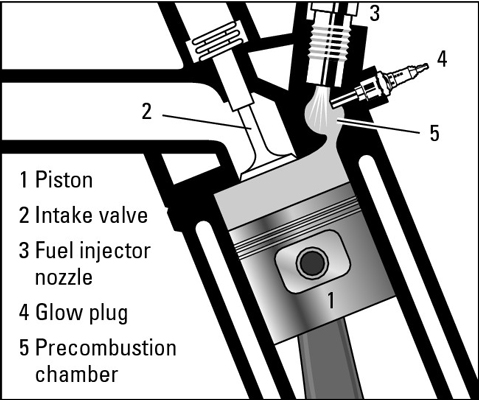
The basic difference between a diesel engine and a gasoline engine is that in a diesel engine, the fuel is sprayed into the combustion chambers through fuel injector nozzles just when the air in each chamber has been placed under such great pressure that it’s hot enough to ignite the fuel spontaneously.
Following is a step-by-step view of what happens when you start up a diesel-powered vehicle.
  1. You turn the key in the ignition.
    Then you wait until the engine builds up enough heat in the cylinders for satisfactory starting. (Most vehicles have a little light that says “Wait,” but a sultry computer voice may do the same job on some vehicles.) Turning the key begins a process in which fuel is injected into the cylinders under such high pressure that it heats the air in the cylinders all by itself. The time it takes to warm things up has been dramatically reduced — probably no more than 1.5 seconds in moderate weather.
    Diesel fuel is less volatile than gasoline and is easier to start if the combustion chamber is preheated, so manufacturers originally installed little glow plugs that worked off the battery to pre-warm the air in the cylinders when you first started the engine. Better fuel management techniques and higher injection pressures now create enough heat to touch off the fuel without glow plugs, but the plugs are still in there for emissions control: The extra heat they provide helps burn the fuel more efficiently. Some vehicles still have these chambers, others don’t, but the results are still the same.
    Glow plugs provide extra heat to burn fuel more efficiently.
    Glow plugs provide extra heat to burn fuel more efficiently.
  2. A “Start” light goes on.
    When you see it, you step on the accelerator and turn the ignition key to “Start.”
  3. Fuel pumps deliver the fuel from the fuel tank to the engine.
    On its way, the fuel passes through a couple of fuel filters that clean it before it can get to the fuel injector nozzles. Proper filter maintenance is especially important in diesels because fuel contamination can clog up the tiny holes in the injector nozzles.
    A diesel fuel filter.
    1. A diesel fuel filter.
    2. The fuel injection pump pressurizes fuel into a delivery tube.
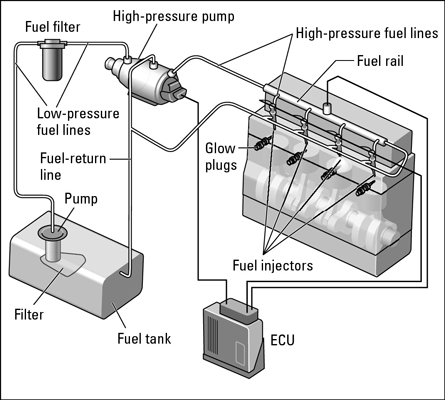
      This delivery tube is called a rail and keeps it there under constant high pressure of 23,500 pounds per square inch (psi) or even higher while it delivers the fuel to each cylinder at the proper time. (Gasoline fuel injection pressure may be just 10 to 50 psi!) The fuel injectors feed the fuel as a fine spray into the combustion chambers of the cylinders through nozzles controlled by the engine’s engine control unit (ECU), which determines the pressure, when the fuel spray occurs, how long it lasts, and other functions.
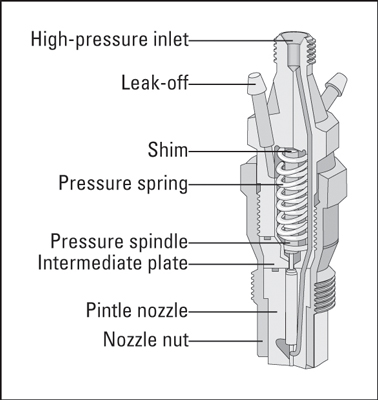
      Anatomy of a fuel injector.
      Anatomy of a fuel injector.
      Other diesel fuel systems use hydraulics, crystalline wafers, and other methods to control fuel injection, and more are being developed to produce diesel engines that are even more powerful and responsive.
      A common rail fuel injection system.
      A common rail fuel injection system.
    3. The fuel, air, and “fire” meet in the cylinders.
      While the preceding steps get the fuel where it needs to go, another process runs simultaneously to get the air where it needs to be for the final, fiery power play.
      On conventional diesels, the air comes in through an air cleaner that’s quite similar to those in gas-powered vehicles. However, modern turbochargers can ram greater volumes of air into the cylinders and may provide greater power and fuel economy under optimum conditions. A turbocharger can increase the power on a diesel vehicle by 50 percent while lowering its fuel consumption by 20 to 25 percent!
    4. Combustion spreads from the smaller amount of fuel that’s placed under pressure in the precombustion chamber to the fuel and air in the combustion chamber itself.

Thursday 5 May 2016

Transmission (mechanics)

Transmission (mechanics)


transmission is a machine that consists of a power source and a power transmission system, which provides controlled application of the power. Often the term transmission refers simply to the gearbox that uses gearsand gear trains to provide speed and torqueconversions from a rotating power source to another device.[1][2]
In British English, the term transmission refers to the whole drivetrain, including clutch, gearbox, prop shaft (for rear-wheel drive), differential, and final drive shafts. In American English, however, the term refers more specifically to the gearbox alone, and detailed usage differs.[note 1]
The most common use is in motor vehicles, where the transmission adapts the output of the internal combustion engine to the drive wheels. Such engines need to operate at a relatively high rotational speed, which is inappropriate for starting, stopping, and slower travel. The transmission reduces the higher engine speed to the slower wheel speed, increasing torque in the process. Transmissions are also used on pedal bicycles, fixed machines, and where different rotational speeds and torques are adapted.
Often, a transmission has multiple gear ratios (or simply "gears") with the ability to switch between them as speed varies. This switching may be done manually (by the operator) or automatically. Directional (forward and reverse) control may also be provided. Single-ratio transmissions also exist, which simply change the speed and torque (and sometimes direction) of motor output.
In motor vehicles, the transmission generally is connected to the engine crankshaft via a flywheel and/or clutch and/or fluid coupling, partly because internal combustion engines cannot run below a particular speed. The output of the transmission is transmitted via the driveshaft to one or more differentials, which drives the wheels. While a differential may also provide gear reduction, its primary purpose is to permit the wheels at either end of an axle to rotate at different speeds (essential to avoid wheel slippage on turns) as it changes the direction of rotation.
Conventional gear/belt transmissions are not the only mechanism for speed/torque adaptation. Alternative mechanisms includetorque converters and power transformation (e.g. diesel-electric transmission andhydraulic drive system). Hybrid configurations also exist. Automatic transmissions use a valve body to shift gears using fluid pressures in conjunction with an ecm.
Single stage gear reducer.

ExplanationEdit

Interior view of Pantigo Windmill, looking up into cap from floor—cap rack, brake wheel, brake and wallower. Pantigo Windmill is located on James Lane, East Hampton, Suffolk County, Long Island, New York.
Early transmissions included the right-angle drives and other gearing in windmillshorse-powered devices, and steam engines, in support of pumpingmilling, and hoisting.
Most modern gearboxes are used to increasetorque while reducing the speed of a prime mover output shaft (e.g. a motor crankshaft). This means that the output shaft of a gearbox rotates at a slower rate than the input shaft, and this reduction in speed produces amechanical advantage, increasing torque. A gearbox can be set up to do the opposite and provide an increase in shaft speed with a reduction of torque. Some of the simplest gearboxes merely change the physical rotational direction of power transmission.
Many typical automobile transmissions include the ability to select one of severalgear ratios. In this case, most of the gear ratios (often simply called "gears") are used to slow down the output speed of the engine and increase torque. However, the highest gears may be "overdrive" types that increase the output speed.

Tuesday 3 May 2016

Power window

Method Five of Five:
Replacing Your Window Motor or Regulator
Edit

  1. Image titled Repair Electric Car Windows Step 26
    1
    Remove the door panel. This task will vary from car to car, but typically you will have to remove some screws around the middle of the panel (such as inside the door pull) and then use a prying tool around the outside to pop out the clips on the perimeter.[2] Sometimes you may have to remove things such as weather-stripping or door moldings as well.
  2. Image titled Repair Electric Car Windows Step 27
    2
    Use a multi-meter to make sure that the motor is getting the correct voltage. Attach the probes of your multi-meter to the motor’s plug and toggle the switch up and down.[3] Make note of the voltage in both directions. Your owner’s manual should list the specific voltage required.
  3. 3
    Ensure that the window moves freely during this test. There should be no slow spots or blockages.
  4. 4
    Unplug the motor. If you the motor is getting the proper voltage but not functioning properly, you likely need to replace it. Start by unplugging the wiring connectors from the motor.
    • If your motor is functioning properly but the window is not responding, you may need to replace your regulator.
  5. 5
    Remove the bolts that attach the regulator to the glass. The regulator is the lift assembly that moves your window up and down. You will have to move the window up or down to align these bolts with a hole in the door interior. Using an extension on a ratchet, you will put a socket (usually 8 or 10 mm) through the hole and loosen the two bolts.
  6. 6
    Push the window all the way up. Use your hands to push the window up, and then either fasten it with tape or pull it out of the door altogether.
  7. 7
    Unplug the wiring harness from the window motor. You will have to press down on the clip that holds the wiring harness into place and pull the harness out. These can be hard to press and sometimes it is best if you can get a screwdriver on it to press it in.
  8. 8
    Unbolt the harness and/or motor from the door's interior. Any bolts holding the harness and motor will have to be removed.
    • These can often be difficult to bolts to remove. You may need to use a ratchet with a long extension to provide the necessary angle to access and turn the bolts.
  9. 9
    Pull the motor and harness out as one assembly. Once you have the assembly removed, you can separate the two pieces and replace the one that is malfunctioning.
  10. 10
    Re-install the motor/regulator assembly. Once you have replaced the malfunctioning part, whether it was the motor or the regulator, it is time to slide the assembly back into the door's interior and bolt it back into it's original position.
  11. 11
    Plug up the new motor. Plug the wiring harness into the window motor. This will provide power to the motor so use caution.
  12. 12
    Lower your window back into its correct place on the wiring harness.Remove the tape or re-install your window. Make sure that the tabs in the bottom of the window are properly aligned to bolt it back onto the regulator.
  13. 13
    Bolt the window to the regulator.Using the bolts you removed earlier and the same extension, you need to bolt your window back to the regulator.
  14. 14
    Test your window. It should now move up and down freely when you press the switch.